
Poli-Flex Premium - Heat Transfer Vinyl - Lilac
by Poli-Flex
Pre-order
Original price
R139.00
-
Original price
R139.00
Original price
R139.00
R139.00
-
R139.00
Current price
R139.00
Delivery time
Kindly note this is a special pre-sold item, and gets ordered from our warehouse per request. Please see lead time below.
Ships Within 2-5 Days
Poli-Flex Premium is an ecologically proven polyurethane film with matt, reflection free surface.
Poli-Flex Premium is suitable to transfer onto textiles like cotton, mixtures of polyester/cotton and polyester/acrylic.
Poli-Flex can be used for lettering on T-Shirts, sport & leisure wear, sport bags and promotional articles.
How to Use Heat Transfer:
- Cut your design using the preset settings for the type of Heat Transfer you are using.
- Remove the extra material around your design.
- The hook is really handy when picking out the small pieces from heat transfer lettering. It makes “weeding” a breeze!
- Place your design onto your shirt {shiny side up} and center it.
- Place a ironing cloth on top of your design. {I used a small piece of scrap muslin.}
- Press firmly down and iron for 45-60 seconds. {I do 60 seconds usually. sometimes more}
- Let the design cool for a few seconds and then carefully peel away the shiny transfer paper. If the design comes up, iron longer. {the pressing down seems to help a lot}
- Now you have a fabulously personalized shirt! ta-da!
Wash Resistance: 80 degrees Celcius
Suitable for tumble dry and dry-cleaning. Wash textile inside out!
How To Make an Iron On Vinyl Mug:
- First, create your design and cut it out however you are most comfortable. Most iron on vinyls have a clear sheet that you remove excess vinyl from to leave only your design. Do that and trim your sheet to about 1/2 inch around your design.
- Clean the mug really well to remove any oils. Use rubbing alcohol, nail polish remover, acetone, or even just hot soapy water. Make sure its 100% dry before you begin.
- Use the towel to create a “nest” for your mug. This way it won’t roll around on you, and you are a lot less likely to burn yourself.
- Heat your iron to the setting indicated by your vinyl – mine was “cotton”.
- Place your design on the mug. Begin in a corner of the design and hold your iron there for 30 seconds. Repeat in small sections until you’ve done this across the whole design. No need to put a lot of pressure or to wiggle the iron around. This is about heating the glue through. (I did this right on the vinyl backer, no rag in between. Test that first. If you are getting melting or other issues, use a rag as a buffer between the hot iron and the design.)
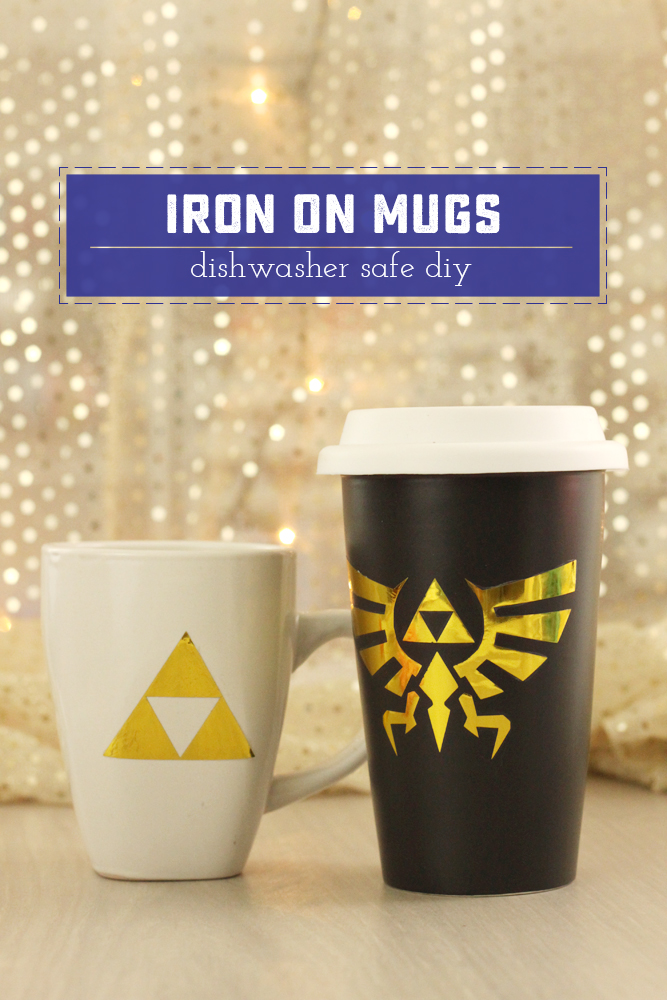
- Now, cover your design with the rag. I find this helps distribute the heat evenly. Take your time and repeat your 30 second sections, this time moving your iron back and forth or in circles, pressing down firmly.
- Let the mug cool. Peel up a section of the backer. If any vinyl comes away with the backer, repeat steps 5 and 6.
- Once the backer comes off clean, check the design with your fingernail and see if anything isn’t quite secure. Pay special attention to small areas (like sentence punctuation or tips/tails of graphics). If anything moves, replace the back and repeat steps 5 and 6, concentrating on that area.
- If desired, you can hit the finished mug with a heat gun, going over the design from a good distance (4 – 5 inches) slowly, until the mug and the design are too hot to touch. In my experience, this helped seal some of the more troublesome areas.
- Done! All of the mugs I made wash well in warm soapy water by hand. This iron on vinyl mug is top rack dishwasher safe! However, I do NOT consider these mugs MICROWAVE SAFE.